7 Essential Photos Every Site Manager Should Take on Every Visit (2026)
Why most construction site photos fail when you need them
A typical site visit produces dozens, sometimes hundreds of photos. Most of them never make it into a report, and the ones that do often fail at the exact moment they are needed: a payment dispute, a hidden defect that surfaces three years after handover, an insurer asking what state the slab was in before it was poured. The problem is rarely the camera. It is the method. Without a deliberate checklist, you come home with thirty close-ups of the same defect, no plan reference, and nothing that places the work in time or space.
This guide gives you the seven photos every site visit should produce, the reasoning behind each one, and how to capture them in a way that holds up when challenged. It is written for architects, site engineers, project managers, and the artisans who build alongside them. It assumes you are working from a phone, in real conditions, with no time to pose anything.
Why the right photos matter more than the camera
A modern phone takes a perfectly defensible photo. What separates a professional record from a holiday album is what surrounds the image: the date, the location on the plan, the trade involved, the annotation that points to the actual issue, and the narrative that ties it to the rest of the project. A photo without that context is evidence of nothing. A photo with it can settle a dispute in a single page.
Three things make a site photo hold up later. First, time: a verifiable timestamp the photo was taken on the day claimed. Second, place: a position on the floor plan, not just GPS coordinates that mean little to anyone not standing on the site. Third, intent: a short caption or audio note explaining what the photo is meant to prove. The seven shots below are chosen to cover the situations where one of those three is most often missing.
1. The establishing shot of the zone
Before any close-up, take one wide-angle photo of the zone you are about to inspect. Stand back, frame the whole room, the whole facade, or the whole structural element. This shot does two things: it gives the reader a reference for everything that follows, and it records the surrounding state in case a related issue surfaces later in a part of the zone you never zoomed into.
Take it from a consistent vantage point so that a return visit can produce the same frame for comparison. Floor-to-ceiling, or end-to-end of a corridor, is usually right. Avoid backlighting if you can, but do not skip the shot to chase better light, an imperfect establishing photo is far better than none. Filed against the project, this is the photo that future-you will scroll back to when an unrelated question comes up about that room.
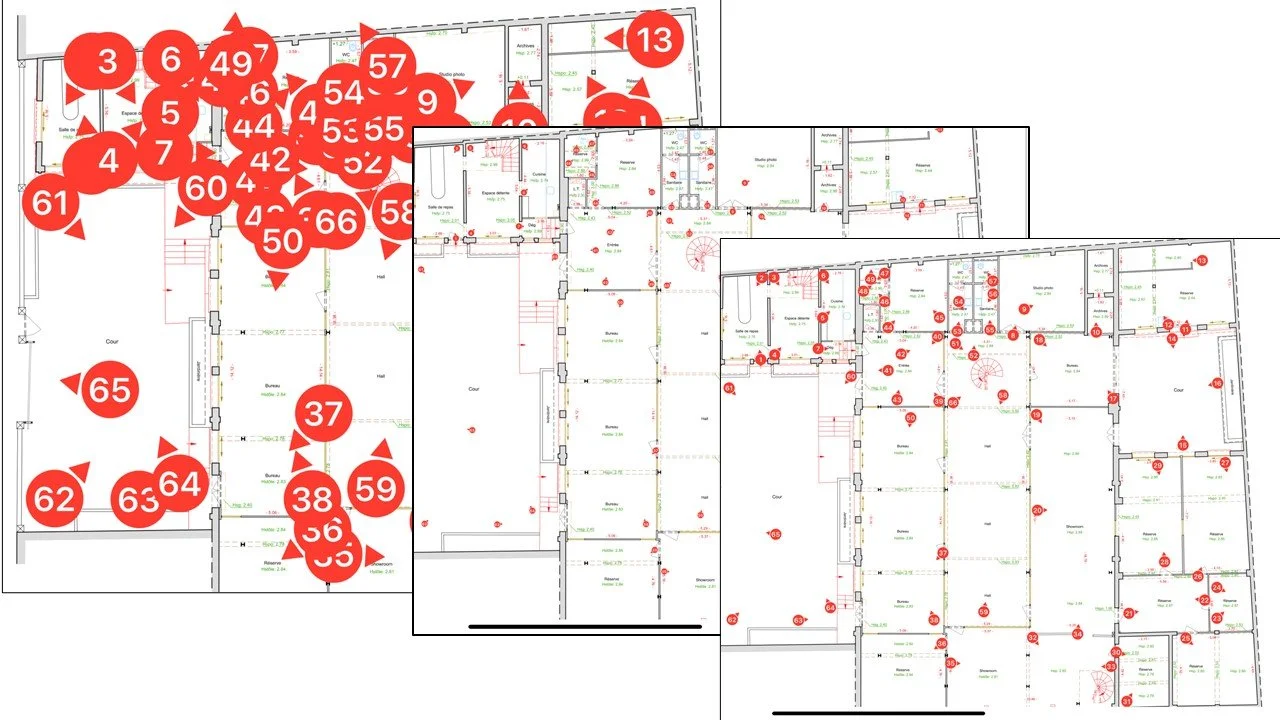
2. The plan-pinned context shot
This is the single photo most site reports get wrong. After the wide shot, take a medium photo that places the next close-up on the building. The frame should include a recognisable architectural feature: a doorway, a window, a structural column, a junction with another zone. The point is not the aesthetic. The point is that anyone looking at the report can identify exactly where on the floor plan this photo was taken.
A photo pinned to the plan is worth ten that are not. It eliminates the most common dispute in construction reports, which is not about what was seen but about where. When you capture this shot, drop a pin on the floor plan in your reporting tool while you are still in the room, while your spatial memory is fresh. PhotoReport stores annotated plans alongside the photos so the pin becomes part of the project record, not a sticky note that gets lost between the site and the office.
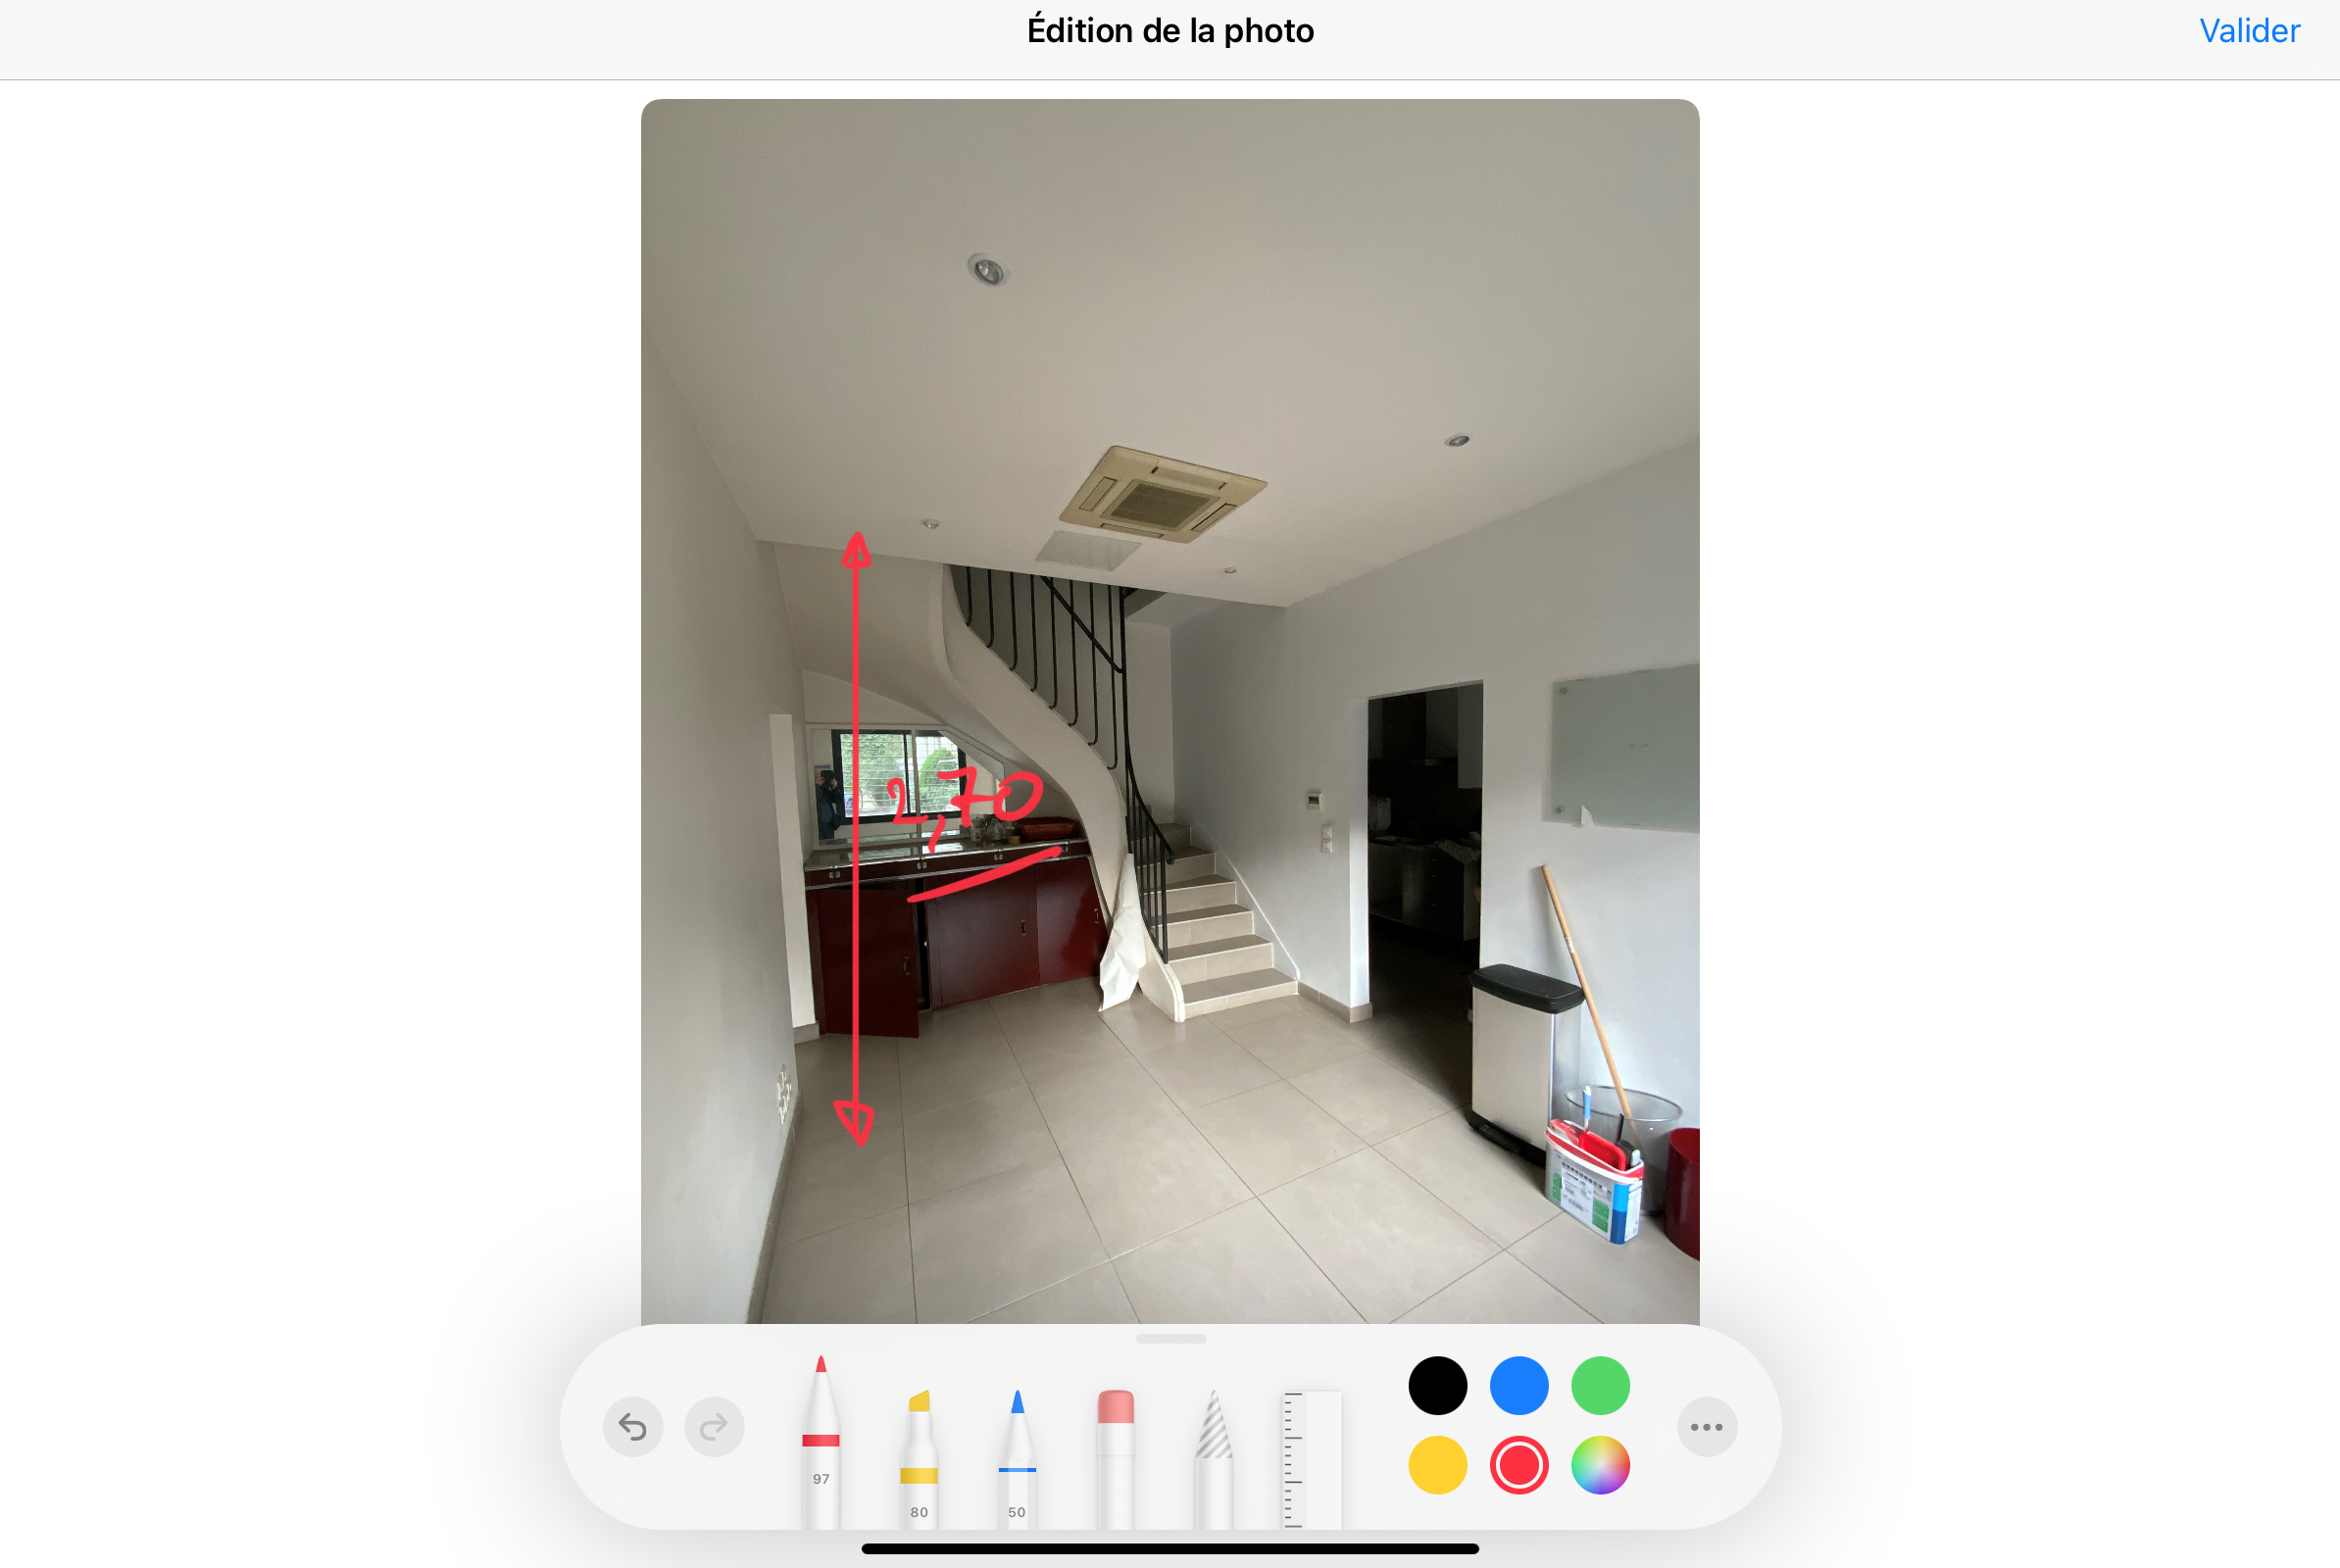
3. The defect or reservation close-up with annotation
The close-up is the photo most people instinctively take, and it is the one most often unusable. The mistake is the absence of scale and the absence of marking. A blurry close-up of a crack with no scale reference, no arrow, and no caption can be argued away. A sharp close-up with a tape measure, a pencil, or a coin in frame, an arrow drawn directly on the photo, and a one-line caption naming the trade and the issue is much harder to dismiss.
Annotate the photo on the phone, in the moment, not back at the office. Arrows, circles, and short text labels drawn directly on the image carry far more weight than a separate document referring to the photo by number. If the defect is a reservation that needs a contractor follow-up, link it to a punch list item with the trade and a deadline. The annotation is not decoration. It is the difference between a photo that proves an issue and a photo that merely shows it.
4. The hidden-works shot before cover
Every project has moments where work is about to disappear under a finish: rebar before the slab pour, insulation before drywall, waterproofing before tiling, electrical runs before plaster. These are the photos that have the highest evidentiary value years after handover, because once the cover is on, no one can verify what is underneath without destruction.
Make a rule on every project: before any cover trade starts, you photograph the substrate. Aim for one wide shot per zone and several mediums showing the critical junctions. Capture them with a clear timestamp and a plan pin, see photo 2. If the project has insulation specifications, layer thicknesses, or specific membrane brands required by the contract, the photo should make those visible. A photo of a roll of insulation lying on the floor proves nothing. A photo of the insulation installed, with the brand markings visible, proves what was delivered and what was installed.
5. The materials and delivery shot
Materials arriving on site are the easiest evidence to lose. Trucks come and go, pallets get unwrapped within hours, and labels disappear into the wind. A photo of a pallet of bags on the ground, with the supplier label, the date of delivery visible, and a wide enough frame to confirm the quantity, is a one-shot answer to half of all future supply disputes.
Two things make this photo work. First, the date and geolocation that a smartphone records automatically, which a reporting tool then attaches to the photo file in the project record. Second, the framing: include both the label and enough context to confirm where on the site the material was placed. This is where automatic timestamps and geotags earn their keep. They turn a routine snap into a piece of evidence with provenance the supplier cannot easily challenge.
6. The trade-handoff state shot
At the end of one trade and before the next moves in, take a photo of the zone in its handoff state. This is the photo nobody schedules and everybody regrets not having. It documents what the incoming trade inherited, which becomes the reference point if a defect later turns out to have existed before they started. Without this shot, two trades blame each other and the project manager has no way to arbitrate.
The handoff photo should be wide enough to show the whole zone in the state it was left, with annotations marking any incomplete items the incoming trade was warned about. If you can, get a signature or a written acceptance attached to the photo set, even informally. The point of this photo is not to assign blame ahead of time. It is to give the next dispute a calm answer instead of a shouting match.
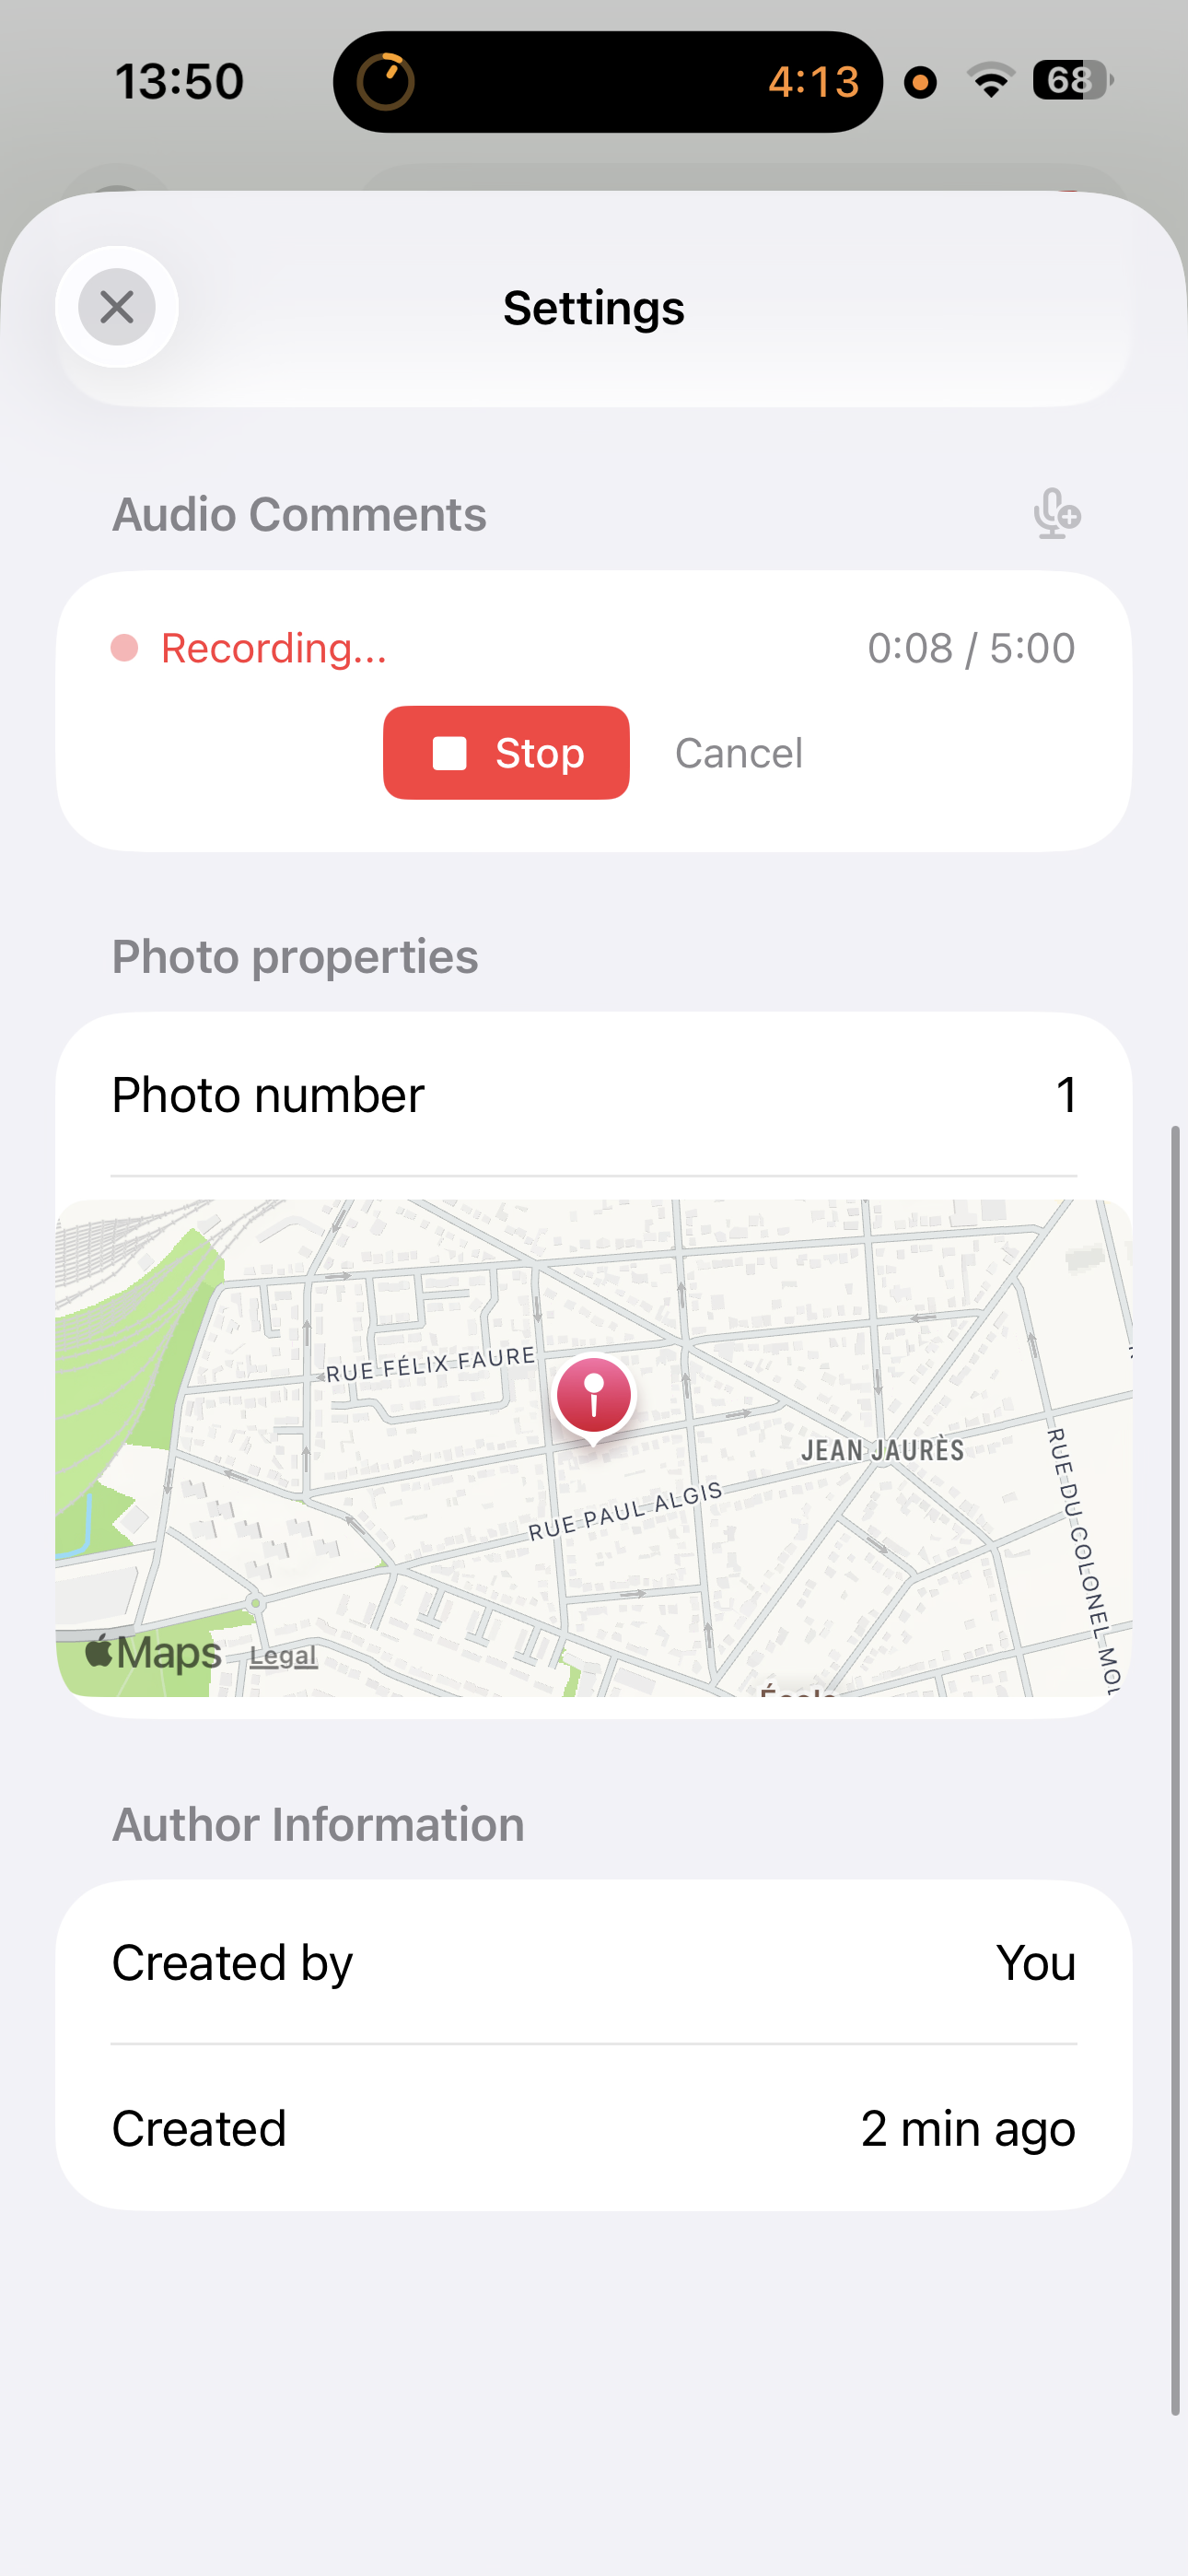
7. The audio or video walkthrough
The seventh capture is the one most site managers skip and the one that recovers the most context. A still photo cannot show motion, cannot demonstrate a noise, cannot capture a smell of damp or the flex of a floor underfoot. A thirty-second video walkthrough, or even a one-minute audio note recorded while you walk a room, fills in everything the camera misses.
Two formats work well in practice. A short video walkthrough captures geometry: the slope of a floor, the way a door swings, the alignment of a row of windows down a facade. An audio comment attached to a still photo captures intent: “tile lippage at the threshold, third tile from the left, contractor was informed today, follow-up in two weeks.” PhotoReport supports both, audio notes are first-class items in the project just like photos, and video walkthroughs are stored at full quality alongside the rest of the record. CompanyCam and similar US-market tools support video but not audio comments attached to photos, which is the format that fits the European site-visit cadence best.
How to take all seven without slowing the visit down
A site visit is not a photoshoot. You have a finite number of minutes per zone, and the photos are not the work, they are the record of the work. Three habits keep the checklist fast.
First, work zone by zone, not by photo type. In each room, take the wide shot, then the plan-pinned context, then any close-ups, then the hidden-works or handoff shot if relevant, in that order. Annotate as you go, do not promise yourself you will do it at the office. By the time you sit down, the spatial memory is gone and half of what felt obvious on site becomes ambiguous.
Second, use one device. A phone with a reporting app is faster than a phone, a clipboard, a separate camera, and a voice recorder. Every device handoff is a missed photo. The annotation tools on the phone, drawing arrows, circling defects, dropping plan pins, are fast enough that there is no time saving in deferring the work.
Third, record the audio note before you leave the room. A two-sentence audio comment, even a rough one, beats a polished caption written three days later from memory. The point is the freshness of the observation, not the elegance of the prose.
Turning the photos into a defensible report
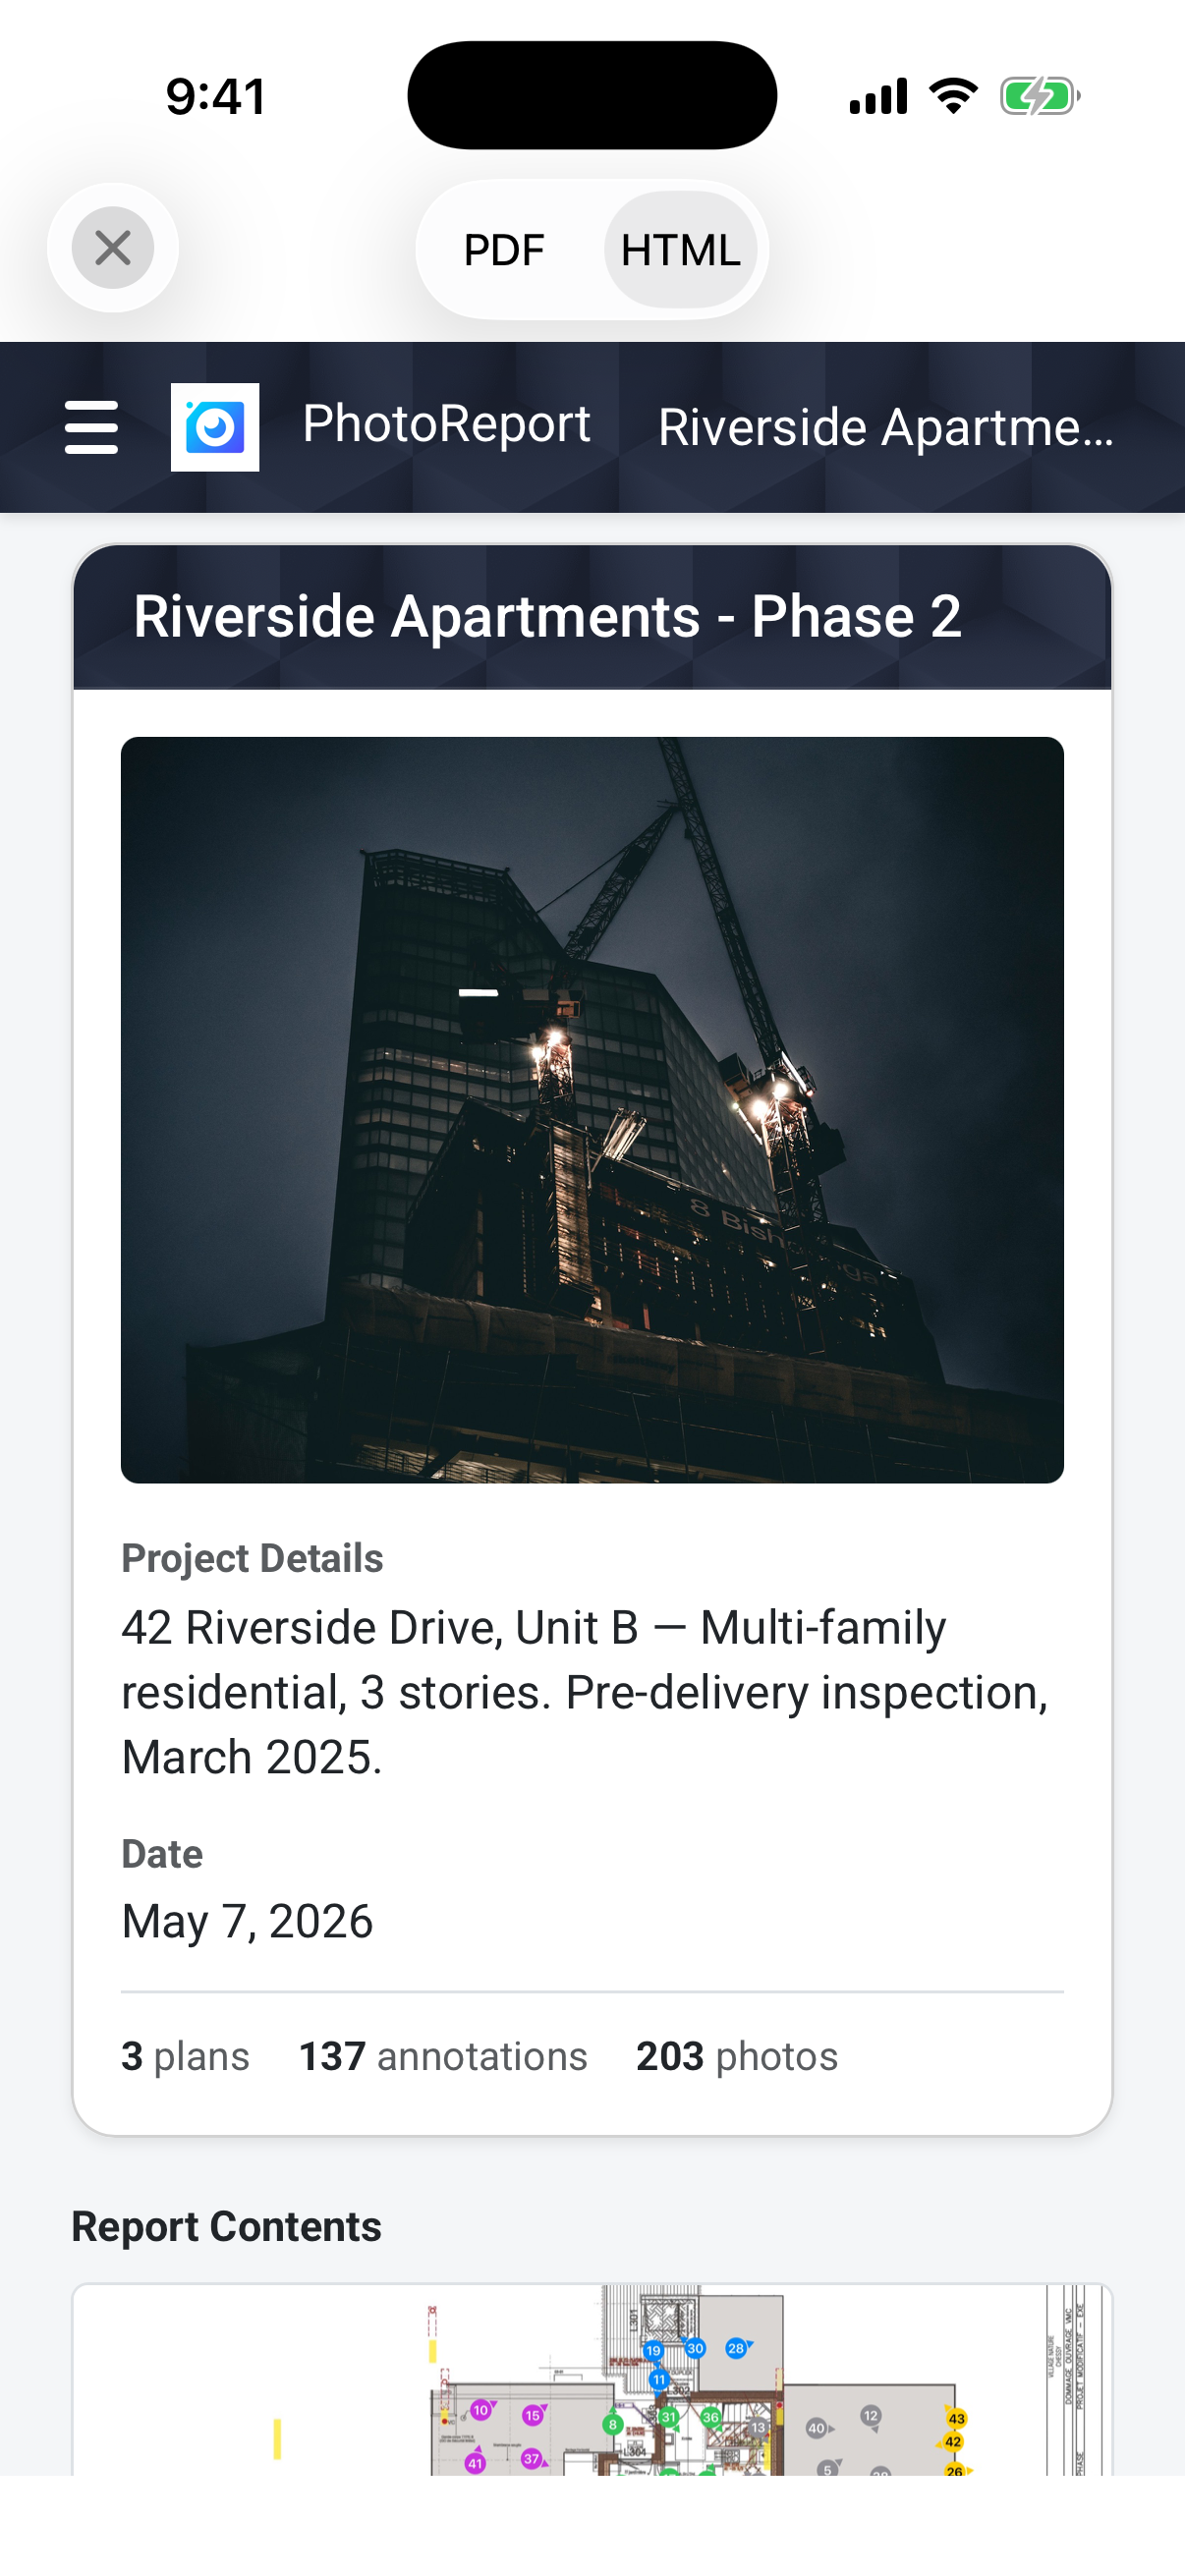
A folder of well-taken photos is still not a report. The transformation happens when each photo is filed against a project, pinned to a plan, tagged with the trade or zone, captioned, and exported in a format the client can read without your software. The export is what makes the record portable, a signed PDF or a self-contained HTML bundle the client can open without an account.
PhotoReport is built around this exact workflow: plans with photo pins, annotations drawn directly on images, audio comments alongside photos, video walkthroughs in the project, and one-tap export to PDF or HTML for sharing with the client and the contractors. Reports are versioned, so the version you sent to the client on a given date stays exactly as it was, even if you continue editing the project afterwards. That immutability is what makes the report opposable.

For a deeper walkthrough of the report format itself, see our site visit report template guide and the companion how-to-write-effective-construction-report post.
FAQ
Should I use a dedicated camera instead of my phone?
For nearly every site, no. A modern phone captures sharper images than most dedicated point-and-shoot cameras, with automatic timestamps and geolocation baked in. A dedicated camera makes sense only for specific cases: very low light without a tripod, high zoom requirements, or 360-degree captures for full-room walkthroughs. For the seven photos above, a phone is the right tool because annotation, plan pinning, and audio capture happen on the same device.
How many photos per visit is the right number?
There is no right number. For a one-hour routine visit, twenty to forty well-filed photos is typical. The metric that matters is not quantity but coverage: every zone has an establishing shot, every defect has a close-up with annotation and a plan pin, every hidden-works moment was caught before cover. A visit with fifteen well-organised photos is more valuable than one with two hundred unsorted images.
Where should I store the photos?
In the project itself, not on the camera roll. A reporting tool that ties each photo to a project, a date, a plan position, and a caption keeps the photos retrievable years later. Camera-roll photos rely on memory to find the right one, and memory fails the moment a dispute arises three years after handover. Cloud storage that backs up the project record automatically, so the phone losing power on site does not lose the visit, is the minimum.
Can the client see the photos directly?
Yes, and they should. The fastest way to align a client on progress is to share a filtered, view-only version of the project with the photos and observations relevant to them, without the internal annotations meant for the contractors. PhotoReport supports per-recipient sharing so the client sees a clean record and the contractor sees the actionable punch list, both backed by the same photos.
How long should I keep site photos for?
Beyond the warranty period of the works, at minimum. For structural work and waterproofing, that means ten years in most European jurisdictions, sometimes more. The hidden-works shot in particular is the one most often retrieved long after handover, so storage that survives a phone change, a laptop replacement, and a tool migration is essential. Project-backed cloud storage solves this in a way that photo backups alone do not.
Try PhotoReport on your next site visit
If the seven photos above are already part of your routine, the next gain is in how fast you can file them, annotate them, and turn them into a report the same day. PhotoReport is built around this workflow on iOS, with plan-pinned photos, audio comments, video walkthroughs, and one-tap PDF and HTML export. Start a free 7-day trial and try the full checklist on your next site.